ChromeOS Flex transforms aging Windows PCs and Macs into fast, secure machines powered by Google's cloud-first operating system.
Unlike a full installation that erases your hard drive, running ChromeOS Flex from USB lets you experience the system without commitment - your files stay safe while you explore.
This guide walks you through downloading the ChromeOS Flex image and creating a bootable USB drive using Rufus, the fastest free USB creation tool available.
What You Need Before Starting
Running ChromeOS Flex from USB requires minimal hardware, making it ideal for reviving older computers that struggle with modern Windows versions.
System Requirements:
- Intel or AMD 64-bit processor (x86-64 architecture).
- 4GB RAM minimum.
- USB flash drive with 8GB or more storage capacity.
- Full BIOS/UEFI access for boot order configuration.
Hardware Compatibility Notes: Components manufactured before 2010 may deliver poor performance. Intel GMA 500, 600, 3600, and 3650 integrated graphics do not meet ChromeOS Flex standards.
Google maintains a certified models list for guaranteed compatibility, though most standard PC hardware works without issues.
Step 1: Download the ChromeOS Flex Image
Google distributes ChromeOS Flex as a compressed BIN file rather than traditional ISO format.
Two methods exist for obtaining the image.
Method A - Chromebook Recovery Utility (Official):
Open Google Chrome browser, visit the Chrome Web Store, and search for "Chromebook Recovery Utility".
Install the extension, then launch it from your browser's extensions menu.
When prompted to identify your Chromebook, select "Google ChromeOS Flex" as manufacturer and "ChromeOS Flex" as product.
The utility downloads and writes the image directly to your USB drive.
Method B - Direct Download (Recommended for Rufus):
Visit Google's official recovery image repository at chromiumdash.appspot.com and download the latest ChromeOS Flex recovery image.
The compressed file weighs approximately 1.3GB.
Extract the archive using 7-Zip or similar decompression software to reveal the BIN file inside. This method offers more control and works reliably with Rufus.
Step 2: Create Bootable USB with Rufus
Rufus creates bootable USB drives significantly faster than most alternatives - up to twice the speed of Microsoft's official tools.
The portable version requires no installation, making it perfect for one-time use.
Detailed Rufus Instructions:
- Download the latest Rufus portable version.
- Insert your USB drive (minimum 8GB capacity).
- Launch Rufus - it runs without installation.
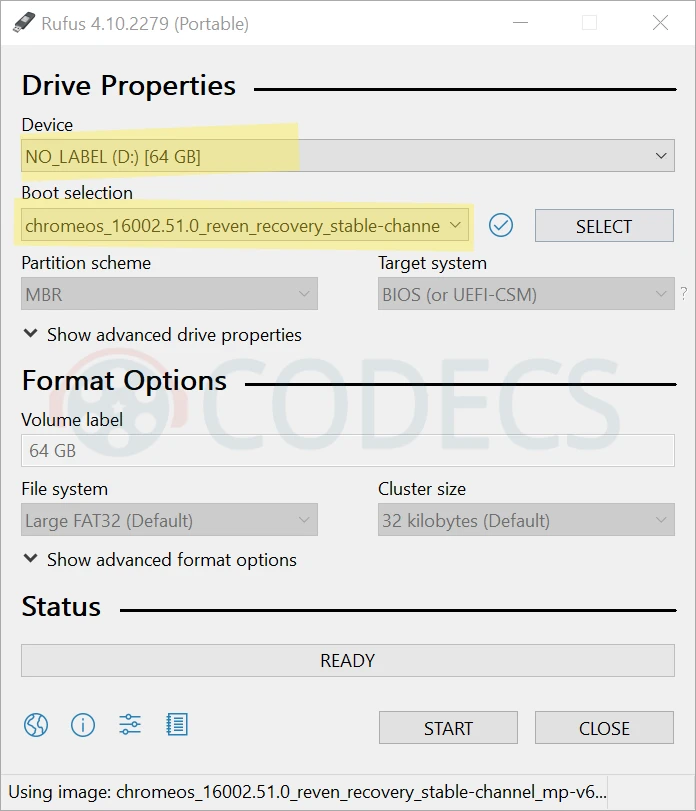
- Under "Device" select your USB drive from the dropdown menu.
- Click the "Select" button next to "Boot selection".
- In the file browser, change the filter from "ISO Image" to "All files" using the dropdown in the bottom-right corner.
- Navigate to your extracted ChromeOS Flex BIN file and click "Open".
- Leave partition scheme and file system settings at their defaults.
- Click "Start" to begin writing the image.
- Confirm the warning about data erasure - all existing USB contents will be deleted.
- Wait approximately 5-10 minutes for completion depending on USB speed.
- Click "Close" when Rufus displays success.
Step 3: Configure BIOS Boot Settings
Before booting from USB, your computer's BIOS must recognize the USB drive as a boot device. Access methods vary by manufacturer.
Common BIOS Access Keys:
- Dell, Lenovo, Toshiba: F12
- HP: Esc or F9
- Acer: F12 or F2
- ASUS: Esc or F8
- MSI: F11
- Apple Mac: Hold Option key during startup.
Restart your computer and repeatedly press the appropriate key immediately after powering on.
Some systems require disabling Secure Boot or enabling Legacy/CSM boot mode for USB booting to work properly. Look for these options in your BIOS security or boot configuration menus.
Step 4: Boot and Run ChromeOS Flex
With BIOS configured correctly, your computer loads ChromeOS Flex from the USB drive. The ChromeOS Flex logo appears followed by a welcome screen.
Initial Setup Process:
- Select your language and keyboard layout.
- Click "Get started" on the welcome screen.
- Choose "Try it first" rather than "Install ChromeOS Flex" - this runs the system from USB without modifying your hard drive.
- Connect to a Wi-Fi network (wired ethernet connections work automatically).
- Sign in with your Google account or browse as a guest.
The "Try it first" option preserves your existing operating system completely. Unlike some Linux distributions that reset everything after restart, ChromeOS Flex in trial mode retains your settings and files across reboots as long as you use the same USB drive.
Performance Expectations Running from USB
USB boot performance depends heavily on drive speed. USB 3.0 drives deliver noticeably better responsiveness than USB 2.0 models. For the smoothest experience, use a modern USB 3.0 or 3.1 flash drive with read speeds above 100MB/s.
ChromeOS Flex prioritizes web applications over local software. Google Docs, Sheets, Slides, Gmail, YouTube, and thousands of web apps run natively through the Chrome browser. For users accustomed to Microsoft Office, the web version of Office 365 works flawlessly within ChromeOS Flex.
Features Available in USB Mode:
- Full web browsing with Chrome.
- Google Workspace applications.
- Linux app support (requires enabling in Settings > Developers).
- Google Assistant integration.
- Nearby Share for file transfers.
- Media playback for most formats - though VLC Media Player on your Windows system handles more obscure codecs.
When to Consider Full Installation
If USB testing confirms ChromeOS Flex meets your needs, installing to the internal drive delivers better performance and automatic updates.
The installation process takes approximately 20 minutes and completely erases your hard drive - back up important files first using external storage or cloud services.
From the ChromeOS Flex login screen, click the time in the bottom-right corner, select "Install ChromeOS Flex," and follow the prompts.
After installation completes, remove the USB drive and reboot into your newly installed system.
Alternative USB Creation Tools
While Rufus remains the fastest option for Windows users, alternatives exist for different platforms and use cases.
Ventoy creates multi-boot USB drives by simply copying image files - no reformatting required each time. Store ChromeOS Flex alongside Ubuntu, Windows installers, and rescue tools on a single drive.
balenaEtcher offers cross-platform compatibility for Windows, Mac, and Linux with automatic image verification. Its simple three-step interface (select image, select drive, flash) suits users wanting minimal configuration.
UNetbootin supports over 50 Linux distributions with built-in download capabilities, useful when creating multiple bootable drives for different operating systems.
For portable Windows installations rather than ChromeOS Flex, WinToUSB creates complete Windows environments that run from USB drives - ideal for technicians needing their customized Windows setup on any computer.
Returning to Windows
ChromeOS Flex running from USB leaves your Windows installation untouched.
Simply shut down ChromeOS Flex, remove the USB drive, and restart normally to return to Windows. Your files, programs, and settings remain exactly as you left them.
If you installed ChromeOS Flex to your hard drive and want Windows back, you'll need Windows installation media. Our guide on creating a bootable USB recovery drive for Windows explains the process using Rufus or Microsoft's Media Creation Tool.

![How to Create a Bootable USB Recovery Drive for Windows 10/11 [2025]](/thumb/250x150/0/guides/pictures/Create-Bootable-USB-Recovery-Drive.png "Screenshot for How to Create a Bootable USB Recovery Drive for Windows 10/11 [2025]")


VBR vs CBR MP3: Better Sound at Half the Size...
Best encoding MP3 only ABR. Audio Quality: ABR>VBR>CBR but for some reason they are trying to hide ...
Read More →How to Download HEVC Video Extension for Free
Thanks a lot!It really works well.I hate the asus.So creepy.
Read More →How to play FLAC files in Windows Media Playe...
@Drasko What is the error message you're seeing? Can you provide more details?
Read More →