A bootable USB recovery drive helps you troubleshoot and restore Windows when your PC won't start normally. This guide walks you through creating one in minutes.
Why You Need a Windows Recovery Drive
A bootable recovery USB allows you to:
- Fix startup problems when Windows won't load.
- Restore your system from a backup.
- Reset Windows to factory settings.
- Access advanced troubleshooting tools.
- Reinstall Windows completely.
Requirements:
- USB drive (16GB minimum, 32GB recommended).
- Working Windows 10/11 PC.
- 30 minutes of time.
Method 1: Using Windows Recovery Drive Tool (Easiest)
This built-in Windows tool creates a recovery environment with troubleshooting utilities.
Connect your USB drive to your computer.
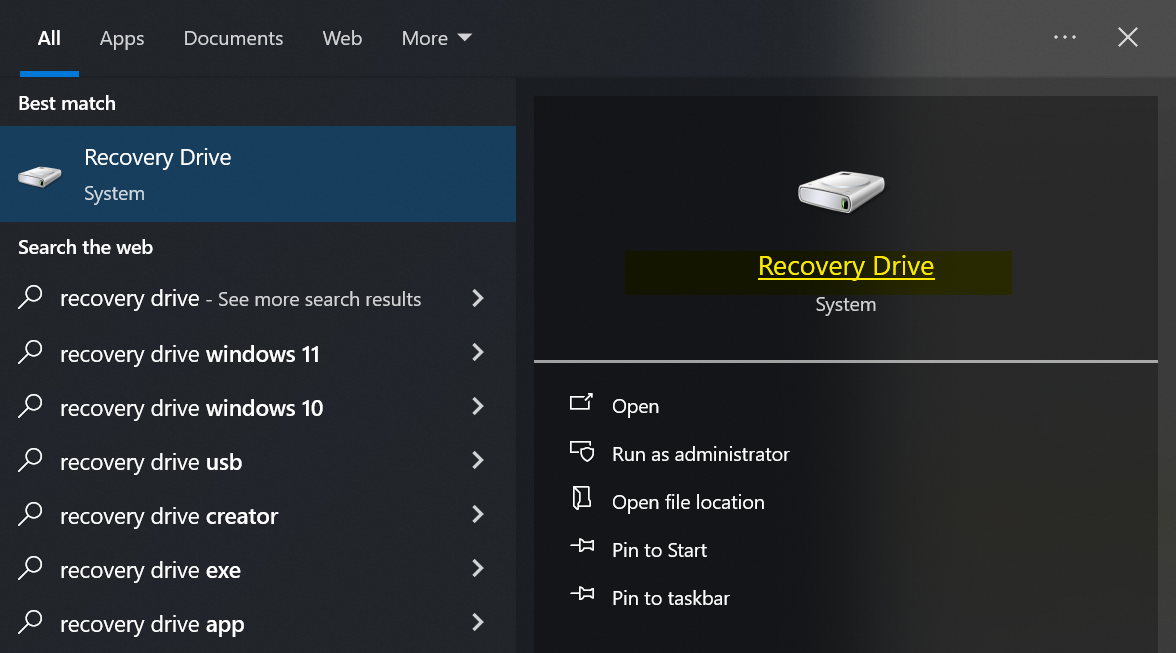
Open Recovery Drive tool: Press Windows + S and type "recovery drive". Click Recovery drive.
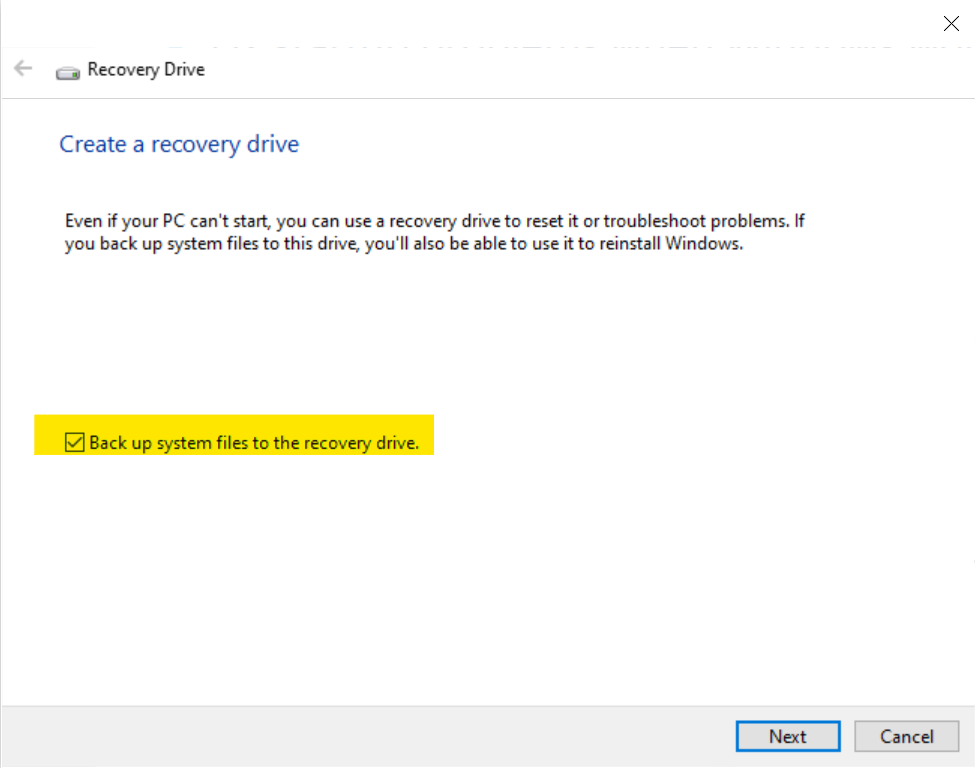
Check "Back up system files" (optional but recommended). This allows you to reinstall Windows from the recovery drive. Requires a larger USB (32GB+).
Click Next and select your USB drive from the list.
Click Create and wait 20-30 minutes.
Don't remove the USB during this process. Your computer may slow down temporarily.
Click Finish when complete.
Cons: Slower, requires larger USB if backing up system files.
Method 2: Using Rufus (More Flexible)
Rufus is faster and gives you more control over the bootable USB creation process.
Download Rufus →
Then go to Download Windows ISO. Select Windows 10 or 11 and download the ISO file.
Launch Rufus and connect your USB drive, then Configure Rufus settings:
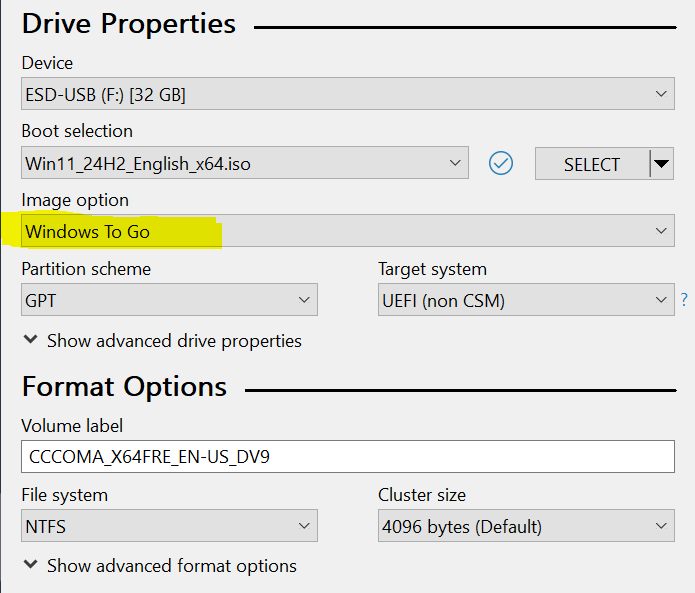
Device: Select your USB drive.
Boot selection: Click SELECT and choose your Windows ISO.
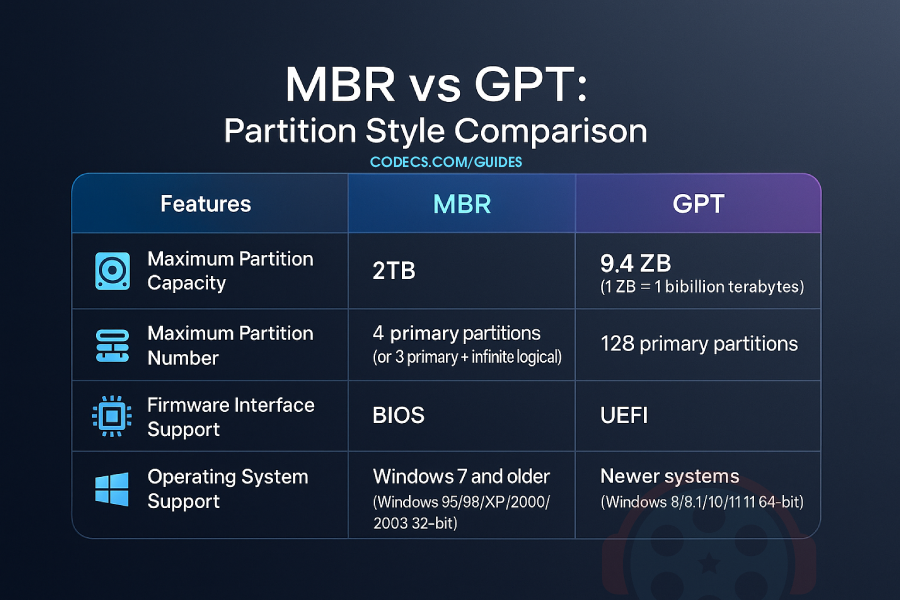
Partition scheme: GPT (for UEFI) or MBR (for Legacy BIOS).
File system: NTFS. Leave other settings as default.
Click START and confirm the warning.
Wait 10-15 minutes for the process to complete.
Launch Rufus and connect your USB drive.
Cons: Requires downloading Windows ISO separately.
Which Method Should You Use?
Compare both methods to find which one fits your needs best.
| Use Windows Recovery Drive If: | Use Rufus If: |
|---|---|
| WR You want the simplest process Official tool, minimal steps — great for non-technical users. | R You need a faster creation process Rufus builds bootable drives faster and supports many image types. |
| WR You want official Microsoft tools Built into Windows, preserving official compatibility and support. | R You already have a Windows ISO Rufus can directly use ISO files and customize partition schemes. |
| WR You need PC-specific recovery files Includes drivers and utilities specific to your machine. | R You want a clean Windows installer Creates pure installation media for any compatible PC. |
| WR You're not tech-savvy Simple, guided steps make it easy to follow. | R You're comfortable with third-party tools Offers advanced settings and flexibility for experienced users. |
How to Use Your Recovery Drive
When you need to boot from your recovery USB:
Restart your computer with the USB plugged in.
Press the boot menu key (usually F12, F11, ESC, or F2). The key varies by manufacturer.
Select your USB drive from the boot menu.
Choose your language and select a recovery option:
- Troubleshoot → Advanced options
- System Restore
- Startup Repair
- Reset this PC
Frequently Asked Questions
Can I use an external hard drive instead of a USB?
Yes, any external storage device works, but USB flash drives are recommended for portability and reliability.
Will this delete everything on my computer?
No, creating the recovery drive only erases the USB. Your computer remains untouched unless you use the drive to reset Windows.
Can I use the same recovery drive on multiple computers?
The Windows Recovery Drive tool creates PC-specific recovery media. For universal recovery media, use Rufus with a Windows ISO.
How often should I update my recovery drive?
Create a new recovery drive after major Windows updates (typically twice a year) to ensure compatibility.
What if my USB isn't recognized by Rufus?
Try a different USB port, reformat the drive using Windows Disk Management, or test with another USB drive.


VBR vs CBR MP3: Better Sound at Half the Size...
Best encoding MP3 only ABR. Audio Quality: ABR>VBR>CBR but for some reason they are trying to hide ...
Read More →How to Download HEVC Video Extension for Free
Thanks a lot!It really works well.I hate the asus.So creepy.
Read More →How to play FLAC files in Windows Media Playe...
@Drasko What is the error message you're seeing? Can you provide more details?
Read More →