Real Android - the actual operating system, not an emulator running inside Windows - boots from a portable SSD on almost any PC. No installation to your hard drive, no dual-boot risk, no $30 BlueStacks subscription.
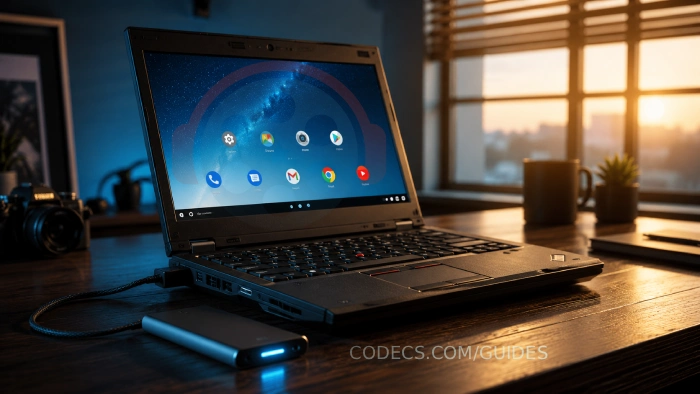
Plug in the SSD, pick it from the boot menu, and you have a full Android desktop in under 60 seconds.
This is how PC tinkerers, app developers, and old-laptop revivers run Android in 2026 - and it has gotten dramatically easier in the last two years.
This guide walks through which Android version to install, the safest tool to write it to an SSD, and the BIOS settings that get it booting on the first try.
Why Run Android on a PC From an SSD
The use cases stack up fast once you realize a portable SSD makes this risk-free.
- Test Android apps without an emulator. BlueStacks is bloated, slow, and increasingly ad-laden. Real Android on real hardware is faster and more accurate.
- Revive an old laptop. A 2014 ThinkPad that crawls under Windows 11 runs Bliss OS smoothly. Cheap second life for hardware that would otherwise be e-waste.
- Sandbox sketchy apps. Run something you don't trust on a separate OS that touches none of your real files.
- Mobile game development. Test ARM apps on x86 with native performance, no virtualization overhead.
- Privacy-first secondary OS. A clean Android install on a drive you can unplug and pocket.
- No license required. Free, open source, no Microsoft account, no activation key.
If you want a hybrid drive, partition it on a PC first, or use a separate cheap USB stick for boot and keep your big SSD for storage. See also USB Stick vs SSD: Which Storage Solution Should You Buy?
Which Android Version Should You Install
Four community-maintained projects port Android to x86 PC hardware. They are not equal in 2026.
Bliss OS - The Recommended Choice
Bliss OS is the most actively maintained Android-for-PC project right now. Current builds run Android 14 (Bliss 16.x), boot on UEFI and legacy BIOS, support most modern GPUs out of the box, and include a polished desktop launcher with taskbar and windowed apps.
Get it from the official Bliss OS download page on SourceForge. Pick the "Generic x86_64" build for desktops and laptops with Intel/AMD CPUs.
Android-x86 - The Original
Android-x86 is the granddaddy project that pioneered Android on PC. Latest stable builds are Android 9, which is dated for app compatibility but rock-solid for older hardware where Bliss OS struggles.
Choose Android-x86 if your PC has integrated Intel graphics from the 2014-2018 era - driver compatibility is better than newer forks.
PrimeOS - Desktop-First Android
PrimeOS reworks Android into a Windows-style desktop with a Start menu, taskbar, and proper window management. Popular among gamers running Android-only titles on PC for keyboard and mouse mapping.
Currently based on Android 11. Stable but updated less frequently than Bliss.
Phoenix OS - Lighter Alternative
Phoenix OS is similar to PrimeOS but lighter and runs on lower-spec hardware. Updates have slowed in 2025-2026 - use only if Bliss OS won't boot on your machine.
What You Need
- Portable SSD with USB-C or USB-A. 64GB minimum, 256GB+ recommended for installing apps. Any USB 3.0+ drive works - USB 3.2 is faster but not required.
- A PC with USB boot support. Almost every PC made after 2010. Older systems may need a quick BIOS setting change.
- The Android ISO. Bliss OS or Android-x86 download (1-2 GB).
- An ISO writer tool. X Drive Writer (recommended) or Rufus - covered below.
- About 15 minutes. Most of it is the ISO downloading and the SSD writing.
Step 1 - Download the Android ISO
Head to the Bliss OS project page on SourceForge. The folder structure is not obvious on first visit, so navigate carefully.
The path you want is: Files → Official → BlissOS16 → Gapps → Generic. Inside Generic, pick the most recent .iso file - at the time of writing, Bliss-v16.9.7-x86_64-OFFICIAL-gapps-20241011.iso (2.4 GB).
Three things to know about the folder names:
- Gapps - Bliss OS with Google Play Store and Services preinstalled. This is what 90% of users want and what the rest of this guide assumes.
- FOSS - Same Bliss OS without Google. Choose this only if you want a fully de-Googled Android with F-Droid instead. Most popular apps (banking, streaming, games) won't run.
- Vanilla - Bare AOSP with neither Google nor F-Droid. Skip unless you're building a custom variant.
Inside Gapps you'll see two subfolders: Generic for standard Intel and AMD PCs, and Surface for Microsoft Surface tablets. Pick Generic unless you actually own a Surface.
For Android-x86 instead of Bliss OS, head to the project page on osdn.net and grab the latest 64-bit ISO. The download structure there is much simpler - just one ISO per release.
While the ISO downloads, also grab the matching .sha256 file from the same folder. Verifying the checksum takes 30 seconds and saves you from a corrupted download wrecking the install.
Recommended - X Drive Writer
X Drive Writer is a 10MB portable Windows utility built specifically for safe ISO writing. It physically filters out the system drive (Windows boot disk cannot be selected) and hides internal drives behind an Advanced toggle that requires typing the drive model name to confirm.
For writing to an external SSD, those safety features are exactly what you want. Download X Drive Writer - no installer, just a single executable.
- Plug your portable SSD into the PC.
- Run X Drive Writer (it requests admin rights - that's required for raw drive access).
- Click Browse and select your Android ISO.
- Pick your portable SSD from the target list. The Windows drive is filtered out so you cannot select it by mistake.
- Choose DD mode - Android ISOs are hybrid images that need byte-for-byte writing. Partition+Extract mode is for Windows installers, not Android.
- Click Write to Drive, confirm, and wait. A 1.5GB Bliss OS ISO writes in 30-60 seconds on a USB 3 SSD.
Alternative - Rufus
Rufus is the Swiss Army knife of bootable USB tools and works equally well for Android ISOs. It's been around longer, has more options, and is what most online tutorials reference.
Choose Rufus if you already have it installed, or if you want extra features like persistent storage partitions for Android (saves your apps and settings between boots, which DD mode does not).
Download Rufus and follow these steps:
- Plug in the portable SSD and launch Rufus.
- Device: select your portable SSD. Triple-check this - Rufus does not filter out internal drives the way X Drive Writer does.
- Boot selection: click SELECT and choose your Android ISO.
- When Rufus asks "Write in ISO Image mode or DD Image mode" - pick DD Image mode. ISO Image mode does not work for Android distributions.
- Click START, confirm the data destruction warning, and wait.
For step-by-step Rufus screenshots and BIOS configuration tips that apply here too, see our bootable USB recovery drive guide.
Multi-boot Setup With Ventoy
If you want to keep multiple Android versions on one SSD (Bliss OS + Android-x86 + maybe a Linux rescue ISO), Ventoy is the right tool.
Ventoy installs once on the SSD, then you simply drag-and-drop ISO files onto it. Boot menu appears at startup letting you pick which OS to launch. This is the most flexible setup if you experiment with different builds.
Step 3 - Boot Your PC From the SSD
The SSD is now bootable. Getting your PC to actually boot from it is the part most guides skip - and where most first-timers get stuck.
Find Your Boot Menu Key
Most PCs have a one-time boot menu accessible by mashing a specific key right after powering on:
- Lenovo / ThinkPad: F12
- Dell: F12
- HP: F9
- ASUS: F8 or Esc
- Acer: F12
- MSI: F11
- Custom-built / generic: F12, F8, or Esc
Plug in the SSD before powering on. Power on, immediately mash the boot menu key. Pick the SSD from the list - it usually shows as "USB HDD" or the drive's brand name.
Disable Secure Boot If Necessary
Modern PCs ship with Secure Boot enabled, and most Android-x86 distributions are not signed for Secure Boot. If your SSD doesn't appear in the boot menu, enter BIOS/UEFI setup (usually F2 or Del at startup) and disable Secure Boot under the Security or Boot tab.
Re-enable it later if you go back to Windows full-time.
Step 4 - First Boot Setup
The Android setup wizard launches just like on a phone: language, WiFi, Google account.
WiFi is the trickiest part. Android-x86 builds include drivers for Intel, Atheros, and Realtek chipsets, but some Broadcom adapters in older laptops won't work. If WiFi fails, plug in an Ethernet cable for setup - native Android handles wired networking out of the box.
Sign in with a Google account to get the Play Store, or skip it for a fully offline Android. The Play Store is fully functional - you can install any app you'd run on a phone.
Performance Tips
USB 3.0 minimum. Booting Android from a USB 2.0 port works but feels like 2010 - apps load slowly, the UI lags. Use a USB 3.0 (blue) or USB-C 3.2 port for full SSD speed.
Allocate persistent storage. If installing rather than running live, give Android at least 32GB for apps and user data. Most modern apps assume plenty of room.
GPU drivers vary. Intel HD/Iris graphics work best - drivers are mature in Bliss OS. AMD Radeon is good. NVIDIA support is hit or miss; check the Bliss OS forums for your specific card.
Trim CPU compatibility. Apps compiled only for ARM work via libhoudini translation - included in Bliss OS, slower than native x86 apps. Most apps now ship x86_64 builds.
Troubleshooting
SSD Doesn't Appear in Boot Menu
Secure Boot is the most common cause - disable it. Second most common: the SSD is plugged into a USB 3.2 Gen 2x2 port that the BIOS doesn't enumerate at boot. Try a USB 3.0 port instead.
Boots to a Black Screen
GPU driver issue. At the boot menu, press Tab or e to edit the boot parameters and add nomodeset after the kernel command. Lets the system boot with generic VESA graphics. Then update GPU drivers from inside Android.
WiFi Not Detected
Driver gap - especially common on older Broadcom chipsets. Workaround: use a $10 USB WiFi adapter with a Realtek RTL8188 chipset. Native Android driver included, plug-and-play.
Touchscreen Not Working on Convertible Laptops
Bliss OS handles most touchscreens automatically; Android-x86 often doesn't. If you have a 2-in-1 laptop, use Bliss OS for the best touch experience.
Drive Doesn't Show Up in Windows After Writing
This is expected behavior, not a bug. DD mode replaces the drive's Windows-readable partition with a Linux ext4 filesystem that Windows cannot read natively.
The drive still works for booting - Windows just cannot browse it from inside Windows itself.
What you'll see in Windows:
- File Explorer: no drive letter appears for the SSD.
- Disk Management (run
diskmgmt.msc): the drive shows up with partitions marked "Healthy" but no letter assigned, sometimes labeled RAW or Unknown. - A popup may appear: "You need to format the disk in drive X: before you can use it".
If Windows pops up asking to format the drive, click Cancel. Clicking Format wipes your Android install. The drive is fine - Windows just cannot read the Linux filesystem on it.
To make the drive Windows-readable again (and lose Android), open Disk Management, right-click each partition on the SSD and choose Delete Volume, then right-click the unallocated space and create a new simple volume formatted as exFAT or NTFS.
If you want to keep Android AND have a Windows-readable section on the same drive, boot a Linux live USB and use GParted to shrink the Android partition, then create an exFAT partition in the free space. Windows will see only the exFAT partition; Android will still boot fine.
Drive Capacity Looks Wrong After Writing
Normal in DD mode. The ISO partition is much smaller than the drive. Reclaim the unused space with Disk Management on Windows or GParted on Linux - create a new partition from the empty space and use it for app data, or extend the Android partition if your distribution supports it.
Going Further
Once you have Android running on a PC, you can do things that aren't possible on a phone: real keyboard and mouse, multi-window with proper window management, screen recording without permission prompts, and dev tools that can ADB into the same machine.
For developers, the workflow is unbeatable - your test device is your dev machine, no USB cable, no slow emulator boot.
For old-PC owners, this is the cheapest hardware refresh available. A 2013 laptop with 4GB RAM that wheezes under Windows runs Android with snap.


How to play FLAC files in Windows Media Playe...
@Drasko What is the error message you're seeing? Can you provide more details?
Read More →The Best Video Player for Android TV - And th...
On Android, Kodi has far the best foreign language subtitle support. Vlc and MX had issues displaying the correct ...
Read More →How to Download HEVC Video Extension for Free
我是一名中国用户,这是我第二次成功在文章指导下下载插件,这篇文章很实用!简单易懂! 我使用的是Windows 11 家庭中文版,操作系统版本 26200.8246。 2026.4.25我已成功下载并使用!感谢发布者,谢谢您!
Read More →