Windows 11 refuses to install in a brand new virtual machine until VMware hands it a security chip, and the setting that does it is two clicks most people never find.
The error says this PC cannot run Windows 11, which is a strange thing to read about a PC that does not exist.
A virtual machine only has the hardware you gave it, and by default that does not include a TPM.
Add one, switch on Secure Boot, and the installer stops arguing.
What Windows 11 Is Actually Asking For
Windows 11 checks for a TPM 2.0 chip and for Secure Boot before it will install, on real hardware and virtual hardware alike. VMware can supply both, but it only sets them up when you pick the right guest operating system in the wizard.
There is a catch with the TPM, and it is why so many people get stuck here. A virtual TPM can only live inside an encrypted virtual machine, so VMware asks you for a password before it will add one.
Good news on the licence. VMware Workstation Pro is free for personal, educational and commercial use, with no licence key to enter. On a Mac, VMware Fusion Pro is the same deal.
What You Need Before You Start
- VMware Workstation Pro, installed on a 64-bit Windows PC.
- A Windows 11 ISO file, downloaded from Microsoft.
- At least 4 GB of memory you can spare for the virtual machine, and 64 GB of free disk space.
- Virtualization switched on in your PC's BIOS or UEFI, listed as Intel VT-x or as SVM Mode on AMD.
There is nothing to burn and nothing to mount, because VMware reads the ISO file directly. If you want that same file available as a drive letter on your host as well, mounting a disc image in Windows takes about a minute with a free tool.
Create the Virtual Machine
- Open Workstation Pro and choose Create a New Virtual Machine, then the Typical setup.
- Choose Installer disc image file (iso) and point it at your Windows 11 ISO.
- On the guest operating system page, select Microsoft Windows, then Windows 11 x64 from the version list. This is the step that unlocks everything else.
- An encryption page appears next. Leave it on the option that encrypts only the files needed to support a TPM, set a password, and write that password down somewhere safe.
- Name the machine, put its folder on your fastest drive, and set the disk size to 64 GB or more.
- Open Customize Hardware, give it at least 4096 MB of memory and two processor cores, then finish.
Workstation adds the virtual TPM for you the moment you choose Windows 11 x64, so there is no separate chip to go hunting for. UEFI firmware and Secure Boot come with it.
You can see both if you open the machine's settings. The TPM sits under the Hardware tab, and the firmware type sits under Options, then Advanced.
Still Getting the Windows 11 Requirements Error
Three things cause it, and they are easy to tell apart.
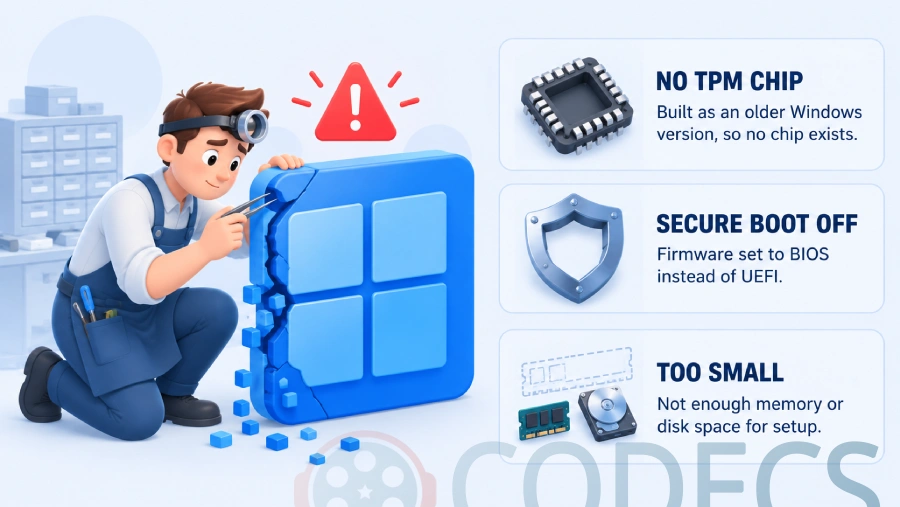
- No TPM. You picked an older Windows version in the wizard, so no chip was ever added - build a new machine as Windows 11 x64.
- Secure Boot off. The firmware is set to BIOS rather than UEFI, which usually means the machine started life as a Windows 10 build.
- Not enough memory or disk. Setup checks the memory and disk minimums before anything else, so a 2 GB machine fails at the same screen for a different reason.
Switching an existing machine from BIOS to UEFI usually means converting its disk from MBR to GPT first, which is more work than starting over. Build a new one instead.
The Registry Bypass, If You Are Stuck With an Existing Machine
Sometimes rebuilding is not an option, and Windows setup has a back door for exactly this. It works the same inside a virtual machine as it does on a real PC.
- At the error screen, press Shift + F10 to open a command prompt.
- Type regedit and press Enter.
- Go to HKEY_LOCAL_MACHINE\SYSTEM\Setup, then create a new key there called LabConfig.
- Inside it, create two DWORD values named BypassTPMCheck and BypassSecureBootCheck, and set both to 1.
- Close the registry editor and the command prompt, then click the back arrow once. Setup runs its checks again and lets you through.
This is the same trick used on unsupported physical PCs, and installing Windows 11 on unsupported hardware covers the version that bakes it into the installer instead.
Skip the config file edit you will find on forums. Adding a software TPM line to the machine's vmx file by hand used to be the popular shortcut, and VMware stopped recommending it after it caused problems in recent releases. The encryption route is the supported one.
Write That Encryption Password Down
This is the part that bites people months later. VMware offers to remember the password in Windows Credential Manager, most people accept, and then nobody ever sees it again.
Copy that virtual machine to another PC, or reinstall Workstation, and it asks for a password you have never typed. There is no recovery option, so a lost password means a lost machine.
What to Do Once Windows 11 Is Installed
Install VMware Tools first, from the VM menu at the top of the window. It is what gives you a properly sized screen, working copy and paste, and shared folders with the host.
Then take a snapshot, before you install anything else. A clean snapshot is the entire point of working this way, and it turns any future mess into a thirty second rollback.
A snapshot is not a backup. It sits in the same folder as the machine it protects, so it disappears with the drive. For anything you would be upset to lose, creating a system image in Windows is the job that actually covers you.
The Microsoft Account Question
Windows 11 setup pushes hard for a Microsoft account and an internet connection, and the old local-account workarounds have been closed one by one. In a machine you built to experiment with, signing in with a spare account is usually the path of least resistance.
After that the normal cleanup applies, and a debloating pass on a fresh Windows 11 strips out the parts you will never open.
Does It Need a Licence
Windows treats a virtual machine as a separate PC, so it wants its own licence. Left unactivated it still runs indefinitely, with a desktop watermark and a greyed-out personalisation page, which is fine for testing.
If you would rather have it properly licensed, the legal ways to get Windows 11 for free sets out what still works and what stopped working.
Who Should Not Bother With a Virtual Machine
If the plan is to play games, this is the wrong tool. Anti-cheat software blocks virtual machines deliberately, and 3D performance is a fraction of what the same PC manages on its own.
If you want Windows 11 as a proper second system with full access to your hardware, setting up a dual boot on one drive is the honest answer, at the price of a reboot every time you switch.
Quick questions
Is VMware Workstation Pro really free for this?
Yes. It is free for personal, educational and commercial use, and there is no licence key to enter during installation.
Do I need a Windows 11 product key?
Not to install it. Windows 11 runs unactivated for as long as you like, with a watermark on the desktop and a few personalisation settings switched off.
Why is my virtual machine asking for a password I never set?
Because the TPM required encryption and Workstation saved the password into Windows Credential Manager rather than showing it to you. Look for VMware Workstation entries in Credential Manager on the PC that created the machine.
Can I skip the TPM instead of encrypting the machine?
You can, with the registry bypass above, but it is the messier route. An encrypted machine with a real virtual TPM behaves like a normal Windows 11 PC, including for features that check for the chip long after setup.
How much memory should I give it?
Four gigabytes is the floor and eight is comfortable, but never hand over more than half of what your PC has. Starve the host and both systems crawl.
Could Hyper-V or WSL be stopping it?
They can. If the machine refuses to power on at all, rather than failing partway through setup, that is a Hyper-V conflict rather than a Windows 11 requirements problem.
Twenty minutes of setup buys you a Windows 11 you are allowed to break.
Download VMware Workstation Pro and build one, or tell us where you got stuck if setup is still refusing you.


Don't Open a .xmpeg File Before Reading This
3/5It's never a good sign when the potential malware you downloaded has the EXACT same filename as the example. ...
Read More →Free Popular IPTV Playlist: Where to Get Fres...
3/5How can you create a DSTV channels on IPTV?
Read More →EAC3 Audio Not Supported in MX Player? Fix It
4/5EAC3 Audio Not Supported in MX Player? Fix It
Read More →