If you're looking to improve video playback quality on Windows without overloading your system, MPC Video Renderer is a fantastic solution.

Designed as a modern DirectShow video renderer, it offers high-performance, high-quality output, perfect for enthusiasts who want smooth playback, accurate colors, HDR support, and minimal resource usage.
It is part of the Media Player Classic - Black Edition (MPC-BE) project, a lightweight open-source media player, delivering the performance needed for smooth 1080p playback, 4K HDR streaming, and home theater setups.
How to download and install MPC Video Renderer:
In this guide, we’ll walk you through the detailed process of downloading, installing, and configuring MPC Video Renderer to work with MPC-BE.
You’ll also learn how to tweak settings for optimal performance and troubleshoot common playback issues.
Let's start by downloading and installing the software:
Download the latest version of MPC-BE.
Once you have downloaded the installer, run it and follow the on-screen instructions to install MPC-BE on your computer.
Download the latest version of MPC Video Renderer from codecs.com.
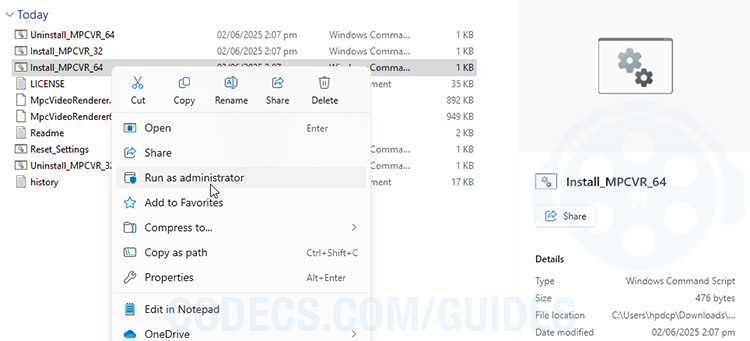
Once you have downloaded the archive, extract its contents to a folder on your computer and install the software (see the image above).
Configure MPC Video Renderer
Launch MPC-BE and go to View > Options. In the "Options" window, click on "Video" in the left-hand pane.
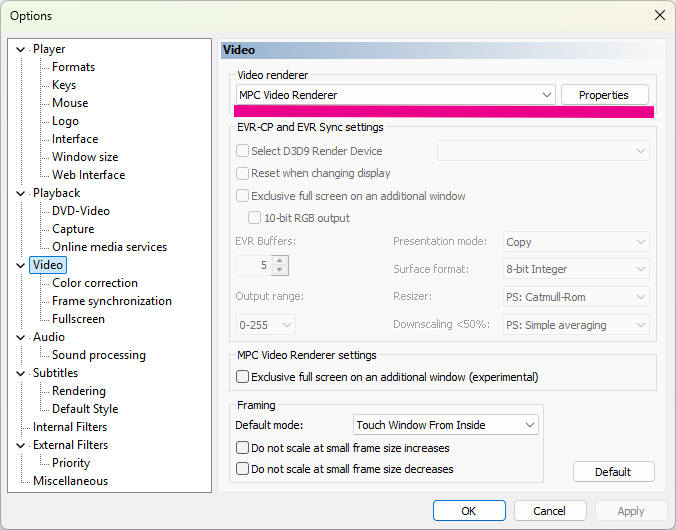
Under "Video renderer", click the "Enhanced Video Renderer (custom presenter)" dropdown and select "MPC Video Renderer".
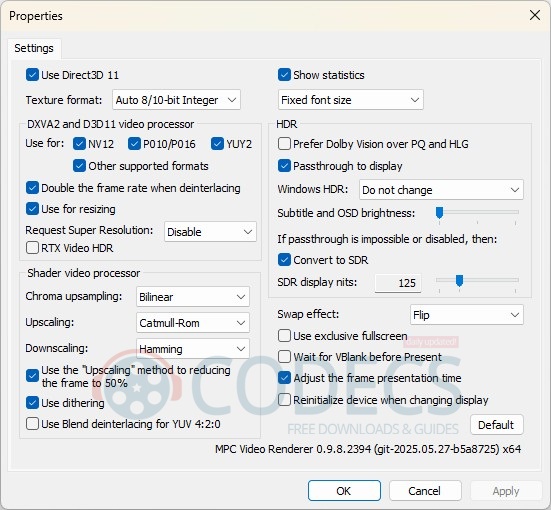
Then, click on "Properties" button to access the settings and adjust them to your preferences.
Here you can adjust settings such as the Shader video processing, Swap effects, etc, but we suggest you to stick with default settings - click on "Default" button to reset them.
Test Playback
Load a high-bit-rate 4K HDR sample.
Press Ctrl + J (or Ctrl + Shift + Escape for Task Mgr) to watch dropped frames/CPU load.
Toggle tone-mapping, debanding, and scaling shaders to evaluate quality vs. performance.
Optional Tweaks
| Goal | Setting |
|---|---|
| Bit-perfect SDR | Disable tone-mapping; set Output Levels to 0-255; disable Use Dithering. |
| Smooth 24 → 60 Hz | Enable GPU’s Adaptive Sync; set Present Queue ≥ 8. |
| Subtitle clarity | In MPC-BE ▸ Subtitles, pick your font & border; let the renderer handle blending. |
| Hardware decoding | Options > Internal Filters > Video Decoders > Video decoder configuration and set Hardware Acceleration to DXVA2 Copy-Back (NVIDIA) or D3D11 (AMD/Intel). |
Troubleshooting
| Symptom | Fix |
|---|---|
| Black screen / audio-only | Ensure filter is registered; update GPU driver. |
| Crashes on file change | Upgrade to the newest build; recent versions fixed rare crashes during mode switch. |
| HDR looks washed-out | Enable Windows HDR; or keep SDR desktop + turn on HDR → SDR tone map in Processing tab. |
| High CPU | Switch HW decoder; lower queue length; disable debanding. |
You’re Done!
Fire up your favorite movie, MPC Video Renderer is now handling the heavy lifting, giving you crisp, artifact-free playback with minimal CPU/GPU usage. Enjoy the show!
Bonus: Some Frequently Asked Questions
Is MPC Video Renderer better than madVR?
For everyday 1080p/4K playback it’s nearly as sharp, lighter on resources, open-source, and keeps working on Windows 7+ without extra licensing.
Can I use it in PotPlayer or MPC-HC?
Yes. Register the filter, then select it in Preferences > Video Renderer. Integration is best in MPC-BE because the dev teams collaborate.
Does it support VRR / G-Sync?
Yes! VRR works as long as your monitor and GPU drivers are enabled; set Present Mode = Flip for best sync.


How to play FLAC files in Windows Media Playe...
@Drasko What is the error message you're seeing? Can you provide more details?
Read More →The Best Video Player for Android TV - And th...
On Android, Kodi has far the best foreign language subtitle support. Vlc and MX had issues displaying the correct ...
Read More →How to Download HEVC Video Extension for Free
我是一名中国用户,这是我第二次成功在文章指导下下载插件,这篇文章很实用!简单易懂! 我使用的是Windows 11 家庭中文版,操作系统版本 26200.8246。 2026.4.25我已成功下载并使用!感谢发布者,谢谢您!
Read More →