Children can successfully learn graphic design fundamentals starting as early as age 3, but the approach must match their developmental stage.
This guide provides you with age-specific tools, activities, and a proven progression that builds from basic visual concepts to advanced digital design skills.
Understanding Your Child's Design Learning Journey
Before diving into tools and activities, it's crucial to understand how children's visual and creative abilities develop.
Research shows that child art development occurs in predictable stages, from the "scribble stage" (2-4 years old) through the "pseudo-realism stage" (11-13 years old), and children's paintings reflect their growth environments and psychological conditions, with characteristics changing as children grow.
In the visual arts, toddlers and young children develop their fine motor skills in conjunction with cognitive thinking and expression, with their markings (scribbles) meaning something to them as they make cognitive connections between these marks and known objects.
Age-Specific Introduction Strategies
Ages 3-5: Foundation Building Through Play
At this stage, focus on sensory exploration and basic visual concepts.
Children can learn and practice skills like patterning and cause and effect through art, developing critical thinking skills by making a mental plan or picture of what they intend to create.
Key Concepts to Introduce:
- Colors and their emotional associations (red = hot/exciting, blue = cool/calm).
- Basic shapes and their recognition.
- Texture through tactile experiences.
- Simple patterns and repetition.
Recommended Starting Activities:
- Color emotion games: Show different colored objects and ask how they make your child feel.
- Shape hunts: Find circles, squares, and triangles in everyday objects.
- Texture collages: Using fabric scraps, sandpaper, cotton balls.
- Pattern making: With stickers, stamps, or simple drawings.
Software Introduction:
Tux Paint is perfect for this age group, offering a colorful, intuitive interface, sound effects, helpful prompts, and fun tools like brushes, stamps, and photo effects designed to build confidence without overwhelming menus.
Ages 6-8: Visual Elements and Basic Design Principles
Children in the "schematic stage" (7-9 years old) begin developing more sophisticated visual awareness and can grasp fundamental design concepts.
Design Elements to Teach:
- Line: Different types (straight, curved, thick, thin) and their uses.
- Shape: Geometric vs. organic shapes.
- Color: Primary, secondary colors and simple color mixing.
- Space: Understanding foreground and background.
- Texture: Visual vs. actual texture.
Design Principles to Introduce:
- Balance: Making things look "even" or "stable".
- Pattern: Repeating elements to create rhythm.
- Contrast: Using opposites to make things stand out.
Practical Projects:
- Logo design for family pets: Simple shapes and colors.
- Birthday card creation: Incorporating text and images.
- Poster design for bedroom: Combining favorite colors and shapes.
Software Progression:
Introduce Kid Pix for its playful interface, then begin exploring Canva for Kids with its easy templates and drag-and-drop functionality that's accessible even from age 4.
Ages 9-12: Advanced Concepts and Digital Mastery
At the "dawning realism stage" (9-11 years old), children develop heightened visual awareness and become more attentive to details and proportions.
This is when formal design training becomes most beneficial.
Advanced Design Principles:
- Hierarchy: Guiding the viewer's eye through importance.
- Unity: Making all elements work together cohesively.
- Emphasis: Creating focal points.
- Movement: Leading the eye through the design.
- Proportion: Understanding size relationships.
Typography Introduction:
Typography is an important part of graphic design, including understanding different fonts (serif vs. sans-serif) and how to choose the right ones for each project.
Complex Projects:
- Magazine cover design: Combining images, text, and design principles.
- App icon creation: Understanding scalability and simplicity.
- Brand identity development: Logo, color palette, and style guide creation.
Software Mastery:
Progress to Canva Pro, Pixlr for photo editing, and introduce Krita or Inkscape for more advanced capabilities.
The Design Thinking Framework for Kids
Design thinking follows a specific process: empathize, define, ideate, prototype, and test, fostering not only innovative solutions but also creative confidence and thinking skills.
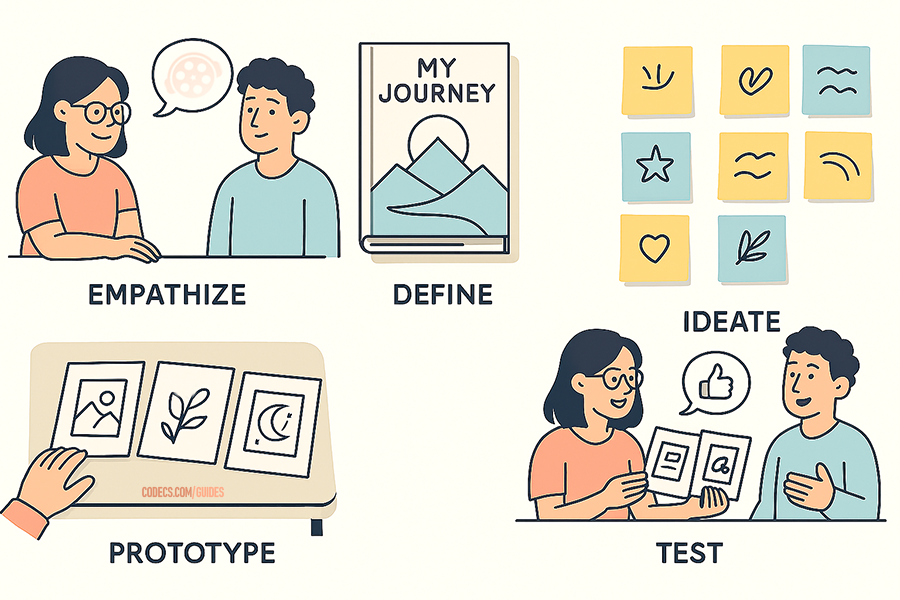
Implementing the 5-Step Process:
- Empathize: Understanding and connecting emotionally with people most directly impacted by the problem to be solved.
- Define: Clearly expressing the problem to tackle.
- Ideate: Generating bold, wild, crazy, impossible, and abundant ideas.
- Prototype: Creating rough, simple versions of ideas.
- Test: Real-life, real-time testing in which others are involved.
Example Project, Designing a book cover for a friend:
- Empathize: Interview your friend about their favorite book.
- Define: Create a cover that represents the story's main theme.
- Ideate: Brainstorm 10 different visual approaches.
- Prototype: Create quick sketches of top 3 ideas.
- Test: Show options to friend and get feedback.
More Creative Examples:
- Creating a "Keep Out" sign for your bedroom door.
- Making a birthday invitation for a younger sibling.
- Designing a logo for your family's pet.
- Creating a poster for the school bake sale.
- Designing a menu for a pretend restaurant.
- Making a poster to promote recycling at school.
- Making an app icon for a game you invented, etc.
Essential Tools and Software by Age
Beginner Tools (Ages 3-6):
- Tux Paint: Free, designed specifically for young children.
- Physical materials: Crayons, markers, construction paper, stickers.
- Color wheel: For learning color relationships.
Intermediate Tools (Ages 7-9):
- Kid Pix: Classic, child-friendly art program.
- Canva for Kids: Web-based with templates.
- Basic art supplies: Colored pencils, fine-tip markers, graph paper.
Advanced Tools (Ages 10-12):
- Canva Pro: Full-featured design platform.
- Pixlr: Browser-based photo editing.
- Krita: Free digital painting software.
- Inkscape: Vector graphics creation.
Creating a Supportive Learning Environment
Adults are encouraged to extend children's learning with verbal stimulation through "Art Talk" - questioning and dialogue that develops both visual and verbal literacy.
Effective Communication Strategies:
- Ask open-ended questions: "Tell me about your design choices".
- Use design vocabulary: "I notice you used contrast here".
- Avoid "What is it?" Instead say: "You worked hard on this".
- Include talk about feelings and objects or representations in artwork.
Building a Progressive Learning Path
Month 1-2: Exploration and Tool Familiarity
- Focus on free exploration with chosen software.
- Emphasize fun over perfection.
- Let children explore freely - they may spend time on unexpected aspects like just using tools differently, which is part of learning through play and trial and error.
Month 3-4: Structured Learning
- Introduce one design element per week.
- Create simple projects combining learned elements.
- Begin discussing why certain designs "work" better than others.
Month 5-6: Project-Based Application
- Assign real-world design challenges.
- Encourage peer feedback and iteration.
- Implement the iterative process: Ideate → Create → Reflect, which most creators use instinctively or intentionally.
Ongoing Development:
- Join online communities for young designers.
- Participate in design challenges and contests.
- Create a portfolio of work showing progression.
Measuring Progress and Celebrating Growth
Art education can help cultivate a growth mindset by positioning mistakes not as something to be avoided, but rather as an integral part of the learning process.
Progress Indicators:
- Technical skills: Improved use of tools and software.
- Design awareness: Noticing and discussing design in everyday life.
- Problem-solving: Using design thinking to address challenges.
- Creative confidence: Willingness to experiment and take risks.
Addressing Common Challenges
"My child gets frustrated with complex software"
Start simpler and progress gradually. Design thinking teaches kids to work through frustration, learning that failure is a natural part of the creative process.
"They want to copy other designs exactly"
Imitation training helps children understand the process of painting creation and improve their ability to use materials. Use copying as a learning tool, then encourage personal variations.
"I don't know enough about design to help"
Research shows that children crave interaction, feedback, and discussion rather than creating in isolation. Your enthusiasm and curiosity matter more than expertise.
Connecting Design to Real-World Applications
Help children understand that graphic design has three major uses: marketing and advertising, publishing (magazines, books, newsletters), and user interface design for websites and apps.
Real-world connections:
- Point out design in everyday life (packaging, signs, websites).
- Discuss how design influences our choices and emotions.
- Connect their projects to professional design work.
- Use authentic, real-world contexts that motivate children because the assignment actually matters.
The Long-term Benefits
Participation in visual arts promotes physical and psychological well-being, and contributes to higher levels of civic engagement and social tolerance. Beyond creative skills, design education develops:
- Critical thinking: Analyzing visual information and making informed decisions.
- Communication skills: Expressing ideas visually and verbally.
- Problem-solving abilities: Using design thinking methodology.
- Cultural awareness: Understanding visual communication across different contexts.
- Digital literacy: Essential 21st-century skills.
Getting Started Today:
The most important step is to begin. Whether your child is 3 or 12, there's an appropriate entry point into design learning.
Start with their current developmental stage, celebrate small wins, and remember that children make ideal design thinkers because their imaginations are vast and uninhibited.


Free Popular IPTV Playlist: Where to Get Fres...
Cool and well web to get anything
Read More →How to Download HEVC Video Extension for Free
Still works July 2026!
Read More →VBR vs CBR MP3: Better Sound at Half the Size...
Best encoding MP3 only ABR. Audio Quality: ABR>VBR>CBR but for some reason they are trying to hide ...
Read More →